Preparing an Apple HD SC for A/UX
September 23, 2020
A/UX Local System Administration 030-0762-A — Chapter 5
This post, a rework of Apple’s “A/UX Local System Administration”, describes how to prepare an Apple Hard Disk (HD) SC to receive an A/UX file system. A file system is a collection of files and file management structures on a mass storage device, such as a hard disk. (If you have a non-Apple hard disk, see the manual accompanying the disk for instructions on preparing it for use.) Preparing a hard disk simply means partitioning the disk to hold distinct types of data. Partitioning a disk is a formal way of preparing the disk to store and retrieve similar types of data and files from the same place on the disk. In nearly all cases, partitioning an Apple Hard Disk SC is done with the Apple HD SC Setup program. The SC in the name stands for the interface that connects hard disks to Apple computers-SCSI (Small Computer System Interface).
This chapter describes how to
- Ensure compatibility between Apple hard disk SCs, and between the disks and A/UX (see “Ensuring Apple HD SC Compatibility with A/UX”)
- Recover from disk data errors by using HD SC Setup (see “Reconfiguring Partitions”)
- Change the partitioning scheme of an Apple HD SC that already contains data (see “Reconfiguring Partitions”)
- Use
dpas necessary to make A/UX recognize the Misc A/UX partition created using HD SC Setup (see “Usingdp”) - How to make and mount an A/UX file system
- Use an auxiliary hard disk partition for additional swap space (see “Adding Swap Space”)
This chapter serves as a reference for the HD SC Setup commands. For complete step-by-step instructions on using HD SC Setup to partition a disk for A/UX user files, a /usr partition, and for A/UX files and the Macintosh OS, see Setting Up Accounts and Peripherals for A/UX.
Why disk partitioning is beneficial
With Apple HD SC Setup 2.0.1, you can subdivide a hard disk into logical sections, called partitions. Partitions allow a disk to accommodate multiple file systems and even multiple operating systems. For example, the A/UX distribution disk contains a partition for the A/UX root file system and another for the Macintosh Operating System, which is called MacPartition. Note that a file system is not equivalent to a partition. File systems, however, are placed into partitions since this is a way of organizing the disk area so that files can be accessed easily. You can think of a partition as a part of a disk, and a file system as an organized, mountable part of a disk.
Storing data in separate partitions saves time and memory space when you make backups. By putting system files in one partition and user files in another, you can easily manage them separately. When making backups, you can concentrate on backing up the partition holding the user files, which change often and thus need backing up frequently. You can ignore the partition that holds the system files, which seldom change. In general, backups can be administered more efficiently when files are thoughtfully distributed among disk partitions.
Multiple A/UX partitions can exist on one hard disk or on several hard disks. If you have an additional hard disk, you can place your user files in a separate partition on the auxiliary disk. It is not advisable to repartition your distribution disk.
Benefits of using HD SC Setup
The benefits of using HD SC Setup include the following:
- It allows you to create an almost unlimited variety of partitioning schemes to subdivide your disk, without having to use additional A/UX utilities, such as d p .
- It performs all of the arithmetic tasks necessary to arrive at the correct starting disk block for each partition, making it easier to use than the corresponding A/UX programs.
- It alters the setup information recorded on the drive to ensure compatibility between A/UX and all levels of Apple HD SC hardware currently available.
Although you can perform all partitioning and initialization functions with A/UX, only the use of HD SC Setup 2.0.1 ensures the correct operation of A/UX with all Apple HD SC hardware.
Considerations before you begin
For detailed hardware installation instructions, refer to Apple Hard Disk SC Owner’s Guide. The most important concerns regarding the hardware setup are the following:
▲ Make sure the power is off while you set up the hardware. ▴
- Set the SCSI ID number so that it doesn’t conflict with existing SCSI devices.
- Position the SCSI cable terminator on the last physically connected drive in the chain.
Chapter 2, “System Startup and Shutdown,” tells how to choose the startup application, which could be A/UX Startup or any other application running under the Macintosh OS.
Important ▲ The HD SC Setup program runs only under the Macintosh OS. If you need instructions on starting the system in the Macintosh as, see A/UX Essentials. ▴
For hard disks other than Apple hard disk SCs, refer to the manufacturer’s instructions. Note that HD SC Setup 2.0.1 is intended for use with Apple HD SCs only.
Ensuring Apple HD SC compatibility with A/UX
⬥ Note: If you need HD SC Setup only to ensure Apple HD SC compatibility with A/UX, you do not need to follow any other of the procedures in this chapter.
The following steps describe how to use HD SC Setup to ensure compatibility between A/UX and all levels of Apple HD SC hardware. For example, suppose you have stored data on an Apple hard disk and you do not want to change the partitioning of the disk. In this case, you should still complete this short procedure to eliminate the possibility that A/UX is incompatible with the disk.
Start or restart your computer in the Macintosh OS after inserting the Utilities 1 disk in the floppy disk drive.
See A/UX Essentials for instructions on starting the system in the Macintosh as.
Open the HD SC Setup application.
Double-click on the HD SC Setup icon, or click its icon to highlight it and then choose Open from the File menu. A dialog box appears, as shown in Figure 5-1.
Click Quit
The Macintosh desktop reappears, and the disk is now set up to be compatible with A/UX. To partition other drives, click on the Drive button, and then follow the same procedures.
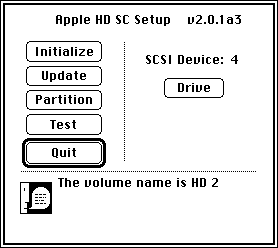 Figure 5-1 The main Apple HD SC Setup (v2.0.1a3) dialog box.
Background on HD SC Setup
The HD SC Setup program is primarily used to initialize and partition disks. It was created for use with the Macintosh OS. When it is used with A/UX, many more partitioning possibilities are available.
HD SC Setup creates a partition by storing specific information in a specially reserved area on the disk, called a partition map. To be accessible, each partition on a disk must have an entry in the disk partition map (DPM). A DPM entry includes the starting block, length, and name of each partition on the disk.
The HD SC Setup program offers a variety of functions from its opening dialog box, including disk initialization and disk partitioning. When you choose disk initialization, the system formats the disk and then tests it by writing various data patterns to all locations on the disk and verifying them. This initialization erases all the information previously on the disk. Additionally, the system builds a bad block table, flagging any defective areas found on the disk so that they won’t be used.
After that, HD SC Setup builds a default partition map, indicating that one Macintosh partition of maximum size is desired.
Next, HD SC Setup asks you to provide a name for the Macintosh volume (the Macintosh term for a file system), within which it has automatically created and placed a file system. (This action is performed for all Macintosh partitions, which always become mountable volumes, but does not occur for any A/UX partitions.) HD SC Setup does this despite the fact that many A/UX users will not want such a partition. If you do not select the Partition button at this point and instead click Quit, this default partition map is written in the partition map on the disk. The image below represents this process with arrows leading from HD SC Setup to the partition map fields labeled Name1, Name2, Type1, Type2, and so on. (The partition map actually includes many more fields than those shown, as described in dpme(4).) As shown in Figure 5-2, the offset stored in the partition map corresponds to the absolute starting disk block: Offset1 is 4000, and the A/UX root
partition is likewise shown to start at that location.
During partitioning, you do not access the partitions themselves. You need to alter the partition map, which in turn changes the configuration of partitions.
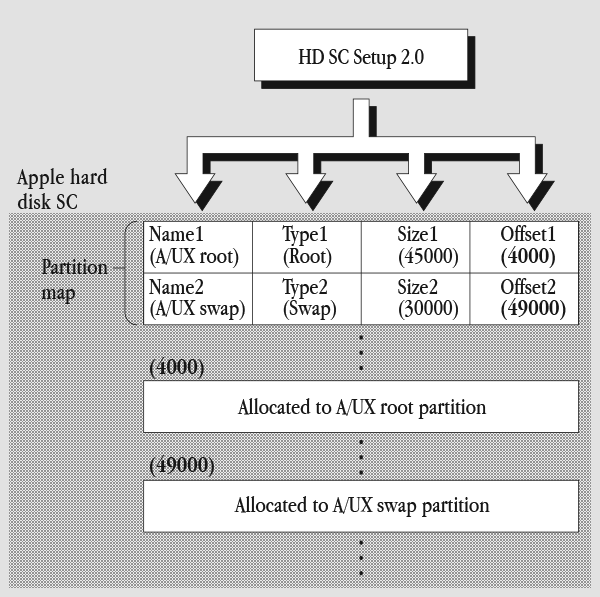 Figure 5-2 Creating disk partitions
Another way to alter the partition map is with the dp utility. Use it with caution since it can disrupt the partition map—for instance, by creating overlapping, unreliable partitions. Probably the only reason you would ever want to use dp is as a debugger, similar to adb, fsdb, and related system programmer commands. See “Using dp,” later in this post, for information about using it to make small changes to a partition map.
When you alter the partition map by resizing or rearranging any of the partitions, the Macintosh and A/UX operating systems lose their ability to locate the start of the old partitions and any files within them. In effect, you lose all of the old files. This action will become clearer when you learn more about the details of an A/UX disk access in the following section.
Background on A/UX file systems
After you create partitions with HD SC Setup, the partitions exist even though there may be nothing meaningful stored in them at the outset. Nevertheless, all subsequent accesses to the disk must honor the partition boundaries recorded in the partition map. For this reason, you must handle all normal file accesses made by Macintosh or A/UX programs through the appropriate operating system routines.
A/UX interacts with partitions in a sophisticated manner, affording you many options for your partition configuration. A/UX allows multiple file systems on a single disk, and all such partitions on all disks can be simultaneously active. The Macintosh Operating System currently supports only one of its file systems per disk. For that reason, it is not worthwhile to partition a given disk with more than one Macintosh partition, although HD SC Setup allows you to do so.
Only the administrator responsible for maintaining these configurations needs to know about the special A/UX file system administration commands. Other users can interact with the file systems transparently and do not need to know what hardware or logical partitions the operating system is accessing during a standard file access. This feature of A/UX is illustrated in the Figure 5-3. As the figure shows, file systems A and B could reside together on one disk, or separately on two disks.
An A/UX file system is a regular data structure that can contain files and directories. It is only one kind of structure that may be placed inside of a partition. For an A/UX file system to be useful, the beginning of the file system must coincide with the beginning of a partition. Then the starting offset block of the partition can be interpreted as the first block of the file system superblock. The superblock is the file system header that contains information about the file system, such as size, number of inodes, and location of free blocks. Each time a file system is mounted, the kernel sets aside a block buffer to hold its superblock. This process is illustrated in the Figure 5-4 as step 2 of the file-access sequence.
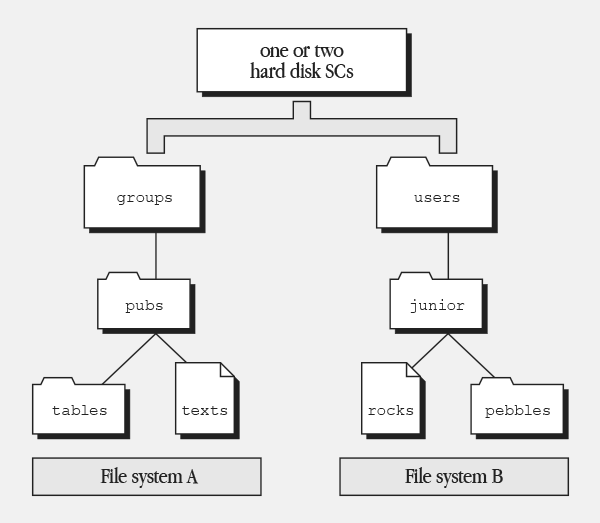 Figure 5-3 Logical file systems compared with physical hardware
 Figure 5-4 File access sequence for A/UX
Following the header or superblock of a partition is a loose collection of disk blocks that can be allocated to files. A disk block is 1 kilobyte long and is usually the smallest unit of information passed to and from the hard disk. A/UX can find the disk blocks that belong to a particular file, even if they are discontinuous, because each time a block is allocated to a file, the superblock, or header, is updated to reflect these assignments. Only disk blocks that have been reserved for use by the file system are assigned to files. Thus the superblock has all the overhead information A/UX needs to alter, delete, or add files within the file system.
The three steps of a file access
Without the partition map to point out where the file system begins, A/UX cannot begin to read any of its files. See step 2 of Figure 5-4.
The first step in accessing a file is to locate the correct partition. Once the starting block offset is known, the subsequent operations are all fairly straightforward. No further disk accesses beyond the file system’s own superblock are necessary to locate the file, as shown in steps 2 and 3 of Figure 5-4.
Rather than access the partition map over and over, A/UX builds a mount table in memory to store the currently recognized file systems. Before the mount table is updated, A/UX must follow the three-step file-access sequence shown in Figure 5-4 (the actual sequence is more elaborate). The mount table contains only the most vital information concerning partitions. For example, it does not include the partition name.
The mount table serves as a quick index to the partition map, so that the system does not have to perform step 1 of the file-access sequence.
Making partitions A/UX-specific: slice numbers
Since a partition may be used for Macintosh file systems, or even other operating systems, A/UX prevents access to partitions that have not been identified for A/UX use (other than slice 30, which is the Macintosh volume MacPartition). A/UX locates the partitions that could contain valid A/UX file systems, or otherwise be used by A/UX, such as swap, by first reading the partition map.
A/UX slice numbers allow for multiple, simultaneously active, and user-configurable file systems that can be accessed through a simple user interface.
A partition that has been identified for A/UX use is assigned a slice number. The slice numbers are A/UX-specific: A/UX performs the service of translating slice numbers into the associated partition locations on the disk. If you use the Misc A/UX partition type in HD SC Setup, or if you partition the disk without HD SC Setup, then you need to use dp to associate a slice number with the partition.
It is not entirely correct to say that A/UX employs slice numbers to distinguish partitions. Partitions always exist. Slice numbers exist for a partition only if the partition has been recognized for A/UX use (slice numbers other than slice 30 are not associated with Macintosh partitions). Because there is no one-to-one correspondence between a slice and a partition, calling a partition a slice can create confusion. Saying that a partition has an associated slice number is more meaningful because it brings the partition into the context of A/UX.
A slice number alone is insufficient to refer to a partition. For this reason, the SCSI ID number is also used, and both are made part of a filename construct that really represents a logical disk device, as described in “Using Partition Administration Commands,” later in this chapter. Only selected administrative commands require you to refer to partitions by slice numbers, since this kind of access differs from the kind that is moderated through a mount point.
When a partition contains an A/UX file system, you can use mount(1M) to allow normal (simplified) access to the file system. However, a slice number must be associated with the partition first.
The user’s perception
The user’s view of a file system is highly regular, since most of the exceptional details about it are disguised to appear as something more familiar. This is a common occurrence in A/UX. For example, a terminal can be accessed from what appears to be a filename. A filename such as this is one of those “exceptional” objects (a terminal) that is represented as a more familiar object (a file). It not only appears as the more familiar object but also can be acted upon with many of the same commands that apply to the more familiar object.
Likewise, the directory that is the start point for another file system is treated like any other directory. A directory is analogous to a Macintosh folder, a structure that can contain other nested directories and files.
From the user’s point of view, an A/UX file system is a hierarchical collection of directories and files seamlessly spreading from the root directory (the upside-down tree image). To the system administrator, the A/UX hierarchical structure is maintained by attaching file systems to other file systems at directory locations called mount points. Mount points are where file systems are attached to the A/UX hierarchy. A mount point is a directory that serves as a point of attachment and as a point of reference. When a mount point appears in a listing (see ls(1)), it seems like any other directory.
Figure 5-5 illustrates the use of mount points, in this case /groups and /users. The straight lines represent the mounting process. Before file systems are mounted on them, the /groups and /users directories would typically be empty.
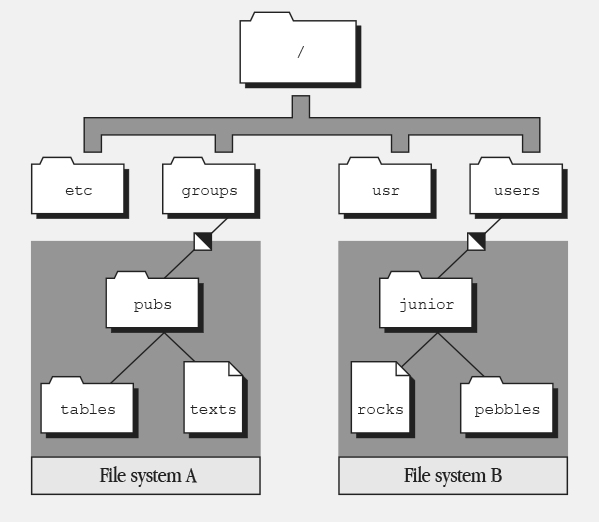 Figure 5-5 The mounting of file systems
Users can identify which file system a file belongs to (at least symbolically) by knowing
- which directories are the mount points
- where the file in question resides
The mount(1M) or df(1M) command tells you which systems are mounted and where they are mounted.
For example, the file called texts in Figure 5-6 is known to be in the file system mounted at /users because of the hierarchical relationships that exist: texts belongs to the directory /pubs, which belongs to the mount-point directory /users. As you would expect in a hierarchical organization, everything located under /users is part of the file system symbolically known as /users . However, you cannot tell what disk and what partition /users corresponds to simply from knowing that /users is a mount point.
Technically, the mount point is the name of a directory. However, when a file system is customarily accessed through the mount point, this mount point soon becomes the name identifying the file system (see mount(1M)).
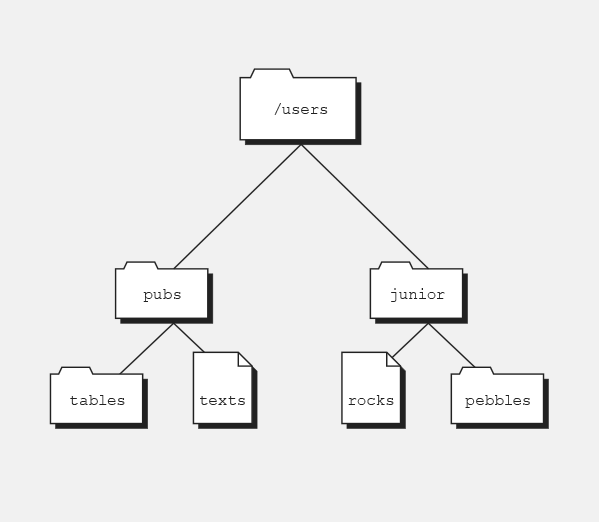 Figure 5-6 Relating a file to a mount point
The administrator’s role
Most users of A/UX do not need to know where any of the mount points are, particularly if they don’t have to administer the system by mounting and unmounting file systems. Because the mounting and unmounting commands are tightly secured in most UNIX implementations, special system access is usually required to perform these administrative tasks.
The mount point is what the user needs to know to gain access to the files in the file system. Even though the mount point is a symbolic name for the file system, it is the name that the user must remember. As the system administrator, you control the symbolic name for a file system simply by using the normal file renaming command, mv(1). (This works only while the file system is unmounted.) The symbolic way of referring to a file system is available only after you mount the file system by using the mount(1M) command.
The mounting process is the means by which the partition-referencing slice numbers and the file-system references to mount points become connected. The existence of a mount table entry for the mount point acknowledges that the starting block offset to a partition is known and that it should also be interpreted as the first block in a valid A/UX file system. The association of a slice number with a partition acknowledges that the starting block of a partition is known and that it is available for A/UX use. Then certain “partition-level” or “file-system-level” operations can be performed upon the associated partition (see “Using Partition Administration Commands,” later in this chapter).
⬥ Note: A partition that does not contain an A/UX file system (such as swap space) should never be allowed to become mounted.
The methods of choosing a partition
For the administration of disks within A/UX, you must use the slice number and the SCSI ID number to refer to a partition, as opposed to a file, on a particular disk; for example, /dev/dsk/c5d0s3. Certain A/UX programs,such as mount(1M),must be able to access the partition directly.
A/UX tries to correlate partitions to slice numbers according to some simple rules. A/UX automatically gives fixed slice numbers to partitions created within HD SC Setup, as long as they are selected to be certain A/UX types of partitions (as shown in Table 5-1, later in this chapter). However, if a partition is not yet associated with a slice number, you need to use dp to create this association. Until a slice number identifies the partition, you cannot perform any partition administration tasks, such as creating or mounting a file system partition. Of course, if there are no slice numbers, you must assign them.
Within HD SC Setup, referring to a partition is not much of an issue for several reasons. The user need only click a screen graphic that represents all of the partitions that exist. From a system viewpoint, HD SC Setup does not actually have to make disk accesses into the partitions to create them, since the program merely updates the partition map at a known disk location.
Because HD SC Setup and A/UX use different partition referencing methods, you need to know how they relate to correlate the partitions of one to those of the other.
You may sometimes be forced to use the dp utility to make A/UX recognize a partition by its slice number. (Although you would need to create more than four local partitions on the root disk, or more than six on an additional disk to ever need dp.) The difficulty of doing this is compounded because these A/UX utilities use the partition name and the partition index number to refer to partitions. Unfortunately, HD SC Setup does not automatically show you the index number or the partition name to help you correlate what you see in HD SC Setup with what you see when you use dp. The partition name and the index number, also known as the partition number, are given in the Details window (see Figure 5-7). HD SC Setup does show you the partition type, which is very similar to the partition name-enough so that the partition name can be of great help when you must use dp to force A/UX to recognize a partition. (A procedure for doing this is
described in “Using dp,” later in this chapter.)
Using partition administration commands
By constructing the appropriate pathname, you specify which disk partition relates to the administrative operation, such as mkfs, mount, or fsck. For most administrative purposes, one can refer to a particular partition on particular HD SCs according to the following pathname format: /dev/dsk/cndmsy
The directory /dev contains a list all of the devices under A/UX. The subdirectory dsk contains a list of the block devices that you can mount as A/UX file systems—for instance, the HD SCs.
The value of n is the SCSI ID of the HD SC; the value of m is the number of the subdrive at that SCSI ID; and the value of y is the slice number associated with a particular disk partition.
Some controller boards support multiple disk drives from one SCSI ID, and m selects that second drive. However, all of the HD SCs that you connect to the Macintosh through its built-in SCSI port have separate SCSI ID numbers; none will be identified as subdrives. For example, the internal hard disk on a computer of the Macintosh II-family or a Macintosh SE computer is identified by the device name /dev/dsk/c0d0sy, the first external HD SC—when given SCSI ID number 5, as is the convention—is identified as /dev/dsk/c5d0sy. The following is a short list of conventions that Apple currently employs:
- Slice 31 always refers to the entire disk.
- For the boot drive, slice 0 always refers to the root partition.
- For the boot drive, slice 1 refers to the swap partition.
- Slice 30 always refers to the MacPartition (the Macintosh volume).
- For the boot drive,slice 2 is reserved for the
/usrfile system if it exists as a separate file system.
The general steps in creating A/UX fde systems
You may need to create A/UX file systems when you initialize a partition—that is, recreate it under HD SC Setup 2.0.1—or when you reconfigure your partitioning scheme by resizing, adding, or deleting partitions.
The complete procedure for creating A/UX file systems involves three main steps:
Boot the Macintosh Operating System and partition the disk using HD SC Setup 2.0.1.
Boot A/UX and use
newfsto create a file system for each A/UX partition in which you want an A/UX file system.Use the
newfsprogram described in “Usingnewfs,” later in this chapter, to create a new UFS file system—the type of file system recommended for the reasons given in Chapter 1, “Managing the A/UX System: An Introduction.”Mount the file system permanently with
fsentry.The
fsentryprogram configures A/UX to mount the new file system each time A/UX starts up.
Warning ▲ Be sure to use HD SC Setup 2.0.1. Earlier versions do not have all of the support capabilities discussed here. ▴
Reconfiguring partitions
The following is a list of overall steps you should complete to reconfigure partitions:
Make backups of your existing fde systems.
If you know you are going to create file systems of the same size and type when you partition the disk over again, you can use a file system utility such as
dump.bsd(1M). (This utility creates a backup that, when it is restored, overwrites the old superblock as well as the old files.) Otherwise, use a file-oriented backup utility such astar(1),cpio(1), orpax(1).These three utilities are more flexible than
dump.bsd, since they allow restoration of individual files or all the files onto any valid A/UX file system with enough space.Turn to Chapter 4, “Adding and Managing Hard Disk SCs,” in Setting Up Accounts and Peripherals for A/UX for instuctions on initializing and partitioning a disk, and creating and mounting a UFS file system.
Restore the original contents of the file system using the appropriate utility.
Reinitializing an error-prone disk
Another situation in which you may need to create an A/UX file system is when, after trying all the less drastic methods to correct disk errors, you resort to HD SC Setup to stabilize an error-prone disk. When you normalize partitions (recreating them under HD SC Setup 2.0.1) you can use the Apple Tape Backup 40SC hardware to make tape backups of A/UX data as well as Macintosh data. The following is a list of overall steps you take to reinitialize an error-prone disk.
Use the short procedure described in “Ensuring Apple HD SC Compatibility with A/UX,” earlier in this chapter.
If you don’t recover normal operations after the first try, then you don’t need to repeat the procedure. If you no longer experience errors, this action alone must have been successful in restoring normal disk operation. In that case, do not perform any of the subsequent steps.
If you are still experiencing disk troubles, use the file system consistency check,
fsck(IM).Normally,
fsckcan fix most data storage inconsistencies on the disk, but you may have to run it few times before it no longer reports errors.If you are still experiencing disk troubles, you may have no choice but to reinitialize and partition the disk.
Follow the procedures given in Chapter 4, “Adding and Managing Hard Disk SCs,” in Setting Up Accounts and Peripherals for A/UX.
Make a file system with the
newfscommand for each new partition, then runfsentry.The
fsentryutility makes anfstabentry and mounts the file system. If required, it makes a mount point. See the sections “Usingnewfs” and “Mounting a File System Permanently:fsentry,” later in this chapter, for instructions on running this command.Restore the original contents of each of the file systems using the most recent backups available.
Using HD SC Setup
Removing a partition
Adding a partition
Grouping partitions
Moving a partition
Viewing information about partitions
Quitting HD SC Setup
You can use Apple HD SC Setup with any Apple SCSI hard disk—such as the Apple HD 20SC, the Apple HD 40SC, the Apple HD 80SC, or the Apple 160SC—that is connected internally or externally to a Macintosh computer. HD SC Setup provides A/UX users with an easy way to allocate space for A/UX partitions.
Setting Up Accounts and Peripherals for A/UX gives step-by-step instructions to partition a disk for
- A/UX user files only
- A
/usrpartition and A/UX user files - A/UX user files and the Macintosh OS
This section provides a reference for the Details, Remove, and Group buttons. It also gives instructions for adding a new partition.
If there is no free space in which to create new partitions (there is no gray area), you must remove a partition and then add partitions in this newly gained space. To resize an existing partition, you must remove it, then recreate it at the desired size (see the following sections, “Removing a Partition” and “Adding a Partition”).
Removing a partition
To make space for new custom partitions, you can remove existing ones. Working in the Custom Partition dialog box, you can remove any partition from your hard disk.
The following steps lead you through the removal of a partition. Before you can use this subprocedure, you must have on the screen the Custom Partition dialog box.
Important ▲ Don’t remove the driver unless you have a special reason. Without the driver, you won’t be able to use your disk after restarting your Macintosh. ▴
Select the partition you wish to remove by clicking anywhere in its rectangle.
The name of that partition is highlighted to show that it has been selected.Click Remove.
An alert box asks you to confirm that you want to erase the information in the partition.Click OK.
Click Cancel if you decide not to remove the partition. When you remove a partition, the space it occupied becomes gray to represent free space. If another area of free space is adjacent, the two rectangles are combined.
Adding a partition
Before you can add a new partition, there must be a section of free space large enough to hold it. If there is insufficient free space, remove one or more partitions. (For more information, see the preceding section, “Removing a Partition.”)
If the free space is divided into sections by existing partitions, with no single section large enough to hold your new partition, you need to remove or move a partition, or combine the sections of free space by grouping the partitions. (For more information, see the next section, “Grouping Partitions.”)
The following steps lead you through the addition of a new partition. Before you can use this subprocedure, the Custom Partition dialog box must be displayed on the screen.
Move the pointer to a gray rectangle representing free space and click in that space.
HD SC Setup draws two brackets representing the new partition. If you place the pointer in the upper half of the free space rectangle, the brackets start at the top of the free space. If you place the pointer in the lower half of the free space rectangle, the brackets start at the bottom of the free space. A shortcut to bypass steps 2 through 5 is to click in the top of the gray area, which presents the Partition Type dialog box. Enter the amount in the Adjust Size box and go to step 6.
Drag the pointer up or down to adjust the size of the new partition.
If you move the pointer to the left or the right of the rectangle, the brackets disappear. The size, in kilobytes, is shown on the left.
When you are satisfied with the size of the new partition, release the mouse button.
You don’t need to be exact. You still have a chance to change the size.
Apple HD SC Setup immediately presents the Partition Type dialog box You use the left side to select a partition type for the custom partition you are creating; you use the right side to adjust its size.
Select the partition type by clicking in the list on the left.
You have several choices for A/UX partitions, some of which are automatically assigned a slice number for use under A/UX, as Table 5-1 shows
A/UX partition types available
| A/UX partition type | Preassigned A/UX slice number | Note |
|---|---|---|
| A/UX Autorecovery | N/A | ▲ Automatically assigned slice numbers |
| A/UX Swap | 1 | |
| A/UX Root&User | 0 | |
| A/UX Root | 0 | |
| A/UX Usr | 2 | |
| Free A/UX | 3 | |
| Free A/UX | 4 | |
| Free A/UX | 5 | |
| Free A/UX | 6 | |
| Misc A/UX | N/A | ▲ Automatically assigned slice numbers |
Note that two of the A/UX partitions are not automatically assigned a slice number. They are A/UX Autorecovery and Misc A/UX. To associate these partitions with slice numbers, you must use the A/UXdp(1M) utility (see “Usingdp,” later in this chapter). Do not use the Autorecovery partition for personal files. You should never need to associate the Autorecovery partition with a slice because theautorecoveryutilities will do this when necessary.
- If you wish to change the size of the partition, enter the correct size in kilobytes.
You can enter the partition size to a precision of a half-kilobyte (O.5K). HD SC Setup will not allow other fractions.
You can change the size by entering a new number for the size of the partition.
The maximum possible size is shown below the Adjust Size box; if you have selected a partition type, the minimum possible size is also shown.
- Click OK.
The HD SC Setup program creates the new partition and again presents the Custom Partition dialog box, in which the new partition is shown.
You can create another custom partition as long as you have sufficient free space, but you can select only a listed partition type.
Click Cancel in the Partition Type dialog box if you wish to return to the Custom Partition dialog box without creating a new partition.
- Click Done in the Custom Partition dialog box to returm to the main HD SC Setup dialog box.
Grouping partitions
If you have created two or more partitions on your disk, and free space separates them, you may eventually end up with multiple free space areas that could be consolidated into one large free space area. Grouping partitions combines the free space on your disk.
Sometimes this function is not available, for instance, when there are no free space areas remaining. At such times the Group button is dimmed.
Before you can use this subprocedure, you must have the Custom Partition dialog box on the screen.
- Click Group.
HD SC Setup presents an alert box, warning that moving information from one portion of your disk to another will take time. Because grouping usually means that a large amount of information is being moved, HD SC Setup also warns that some information might be lost in this process.
- Click OK.
All partitions are grouped together on the disk, and they are shown together at the top of the Custom Partition display.
Click Cancel if you decide not to group the partitions.
Moving a partition
You can also use the mouse to move a partition into adjacent free space or into any free space larger than the partition.
Before you can use this subprocedure, you must have the Custom Partition dialog box on the screen.
Click the partition to be moved.
Drag the partition to its new position.
HD SC Setup won’t let you move a partition slightly into an adjacent free space. You must drag the partition more than halfway.
When you release the mouse button, HD SC Setup presents an alert box, warning that moving information from one portion of your disk to another will take time. HD SC Setup also warns that some information might be lost in the process.
- Click OK to confirm.
Click Cancel if you decide not to move the partition.
Viewing information about partitions
Before you can use this subprocedure, you must have the Custom Partition dialog box on the screen. Follow these steps to see the sizes of your partitions:
Click the Details button.
The Details window, shown in Figure 5-7, appears. It shows each partition, its name (if you must use
dp, remember this name because you will need to use it), type, and size in kilobytes, and the block where the partition begins on the disk. At the bottom of the window, the total disk capacity is displayed.The Details window shows one more type of partition, the partition map, which contains information about the partitions on the disk. You cannot directly change the partition map, which takes up a very small portion of the disk.
If you select a partition before clicking Details, that partition is highlighted in the Details window. If you select a partition in the Details window by clicking one of its lines, the partition is highlighted when you return to the Custom Partition dialog box. You can’t select the partition map.
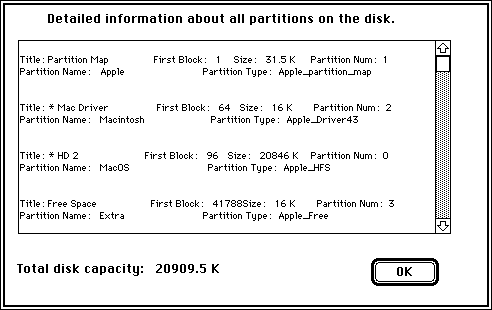 Figure 5-7 The Details window
- Click OK to close the Details window and return to the Custom Partition dialog box.
Quitting HD SC Setup
Click Done in the Custom Partition dialog box to return to the main HD SC Setup dialog box.
When you are satisfied with the partitioning scheme you have obtained using the subprocedures, click Done.
Click Quit to return to the desktop.
No icon will show on the desktop for the new disk unless a Macintosh partition was created somewhere on the disk.
Go to the section “Making and Mounting an A/UX File System,” later in this chapter, or to the next section, “Using
dp,” if you chose Mise A/UX.
Using dp
Perform the following procedure if you have made a partition configuration that includes any partitions of the Misc A/UX type.
⬥ Note: On the boot disk, the types Root, Root&Usr, Usr, and Swap are reserved. The Swap type should be reserved for swapping on all disks. Type Autorecovery is also reserved; it doesn’t have automatic slice numbers associated with it. (Table 5-1 shows how A/UX attempts to map the various partition types to unique slice numbers.) In the context of the dp utility, UFS refers to the /usr file system tree, not the Berkeley File System.
The following procedure leads you through the necessary steps to locate partitions with slice numbers that are not unique, or with missing slice numbers, and to make any necessary changes. You should have already created and mounted file systems with automatically mapped slice numbers. You can have up to four local partitions in the boot disk and up to six on other disks without using dp. (Six on other disks because types Root (slice 9) and Usr (slice 2) are reserved for the boot disk only.)
Warning ▲ The type Autorecovery is reserved and must never be used for your own use ▴
Boot A/UX, if you have not done so already.
Choose Restart from the Special menu. Do not reinsert the System Tools disk. Rather, let the system boot from your installed version of A/UX.
Use the
dputility to obtain the index numbers for any partitions with identical names, and if present, change the duplicates to unique names.Replacing the drive number n with the SCSI ID number of the desired disk, enter the following command:
echo P | dp -q /dev/rdsk/cnd0s31 | egrep “Index|Name”The
dputility responds with a report showing the index number and name of each partition allocated on that disk using the Apple HD SC Setup program. Make note of these values because you will use them in a subsequent step.The names shown by
dpare those shown in the Details window of HD SC Setup (see Figure 5-7).If duplicate names exist, you must assign unique names by using the editing capabilities of
dp. If no duplicates exist, proceed to step 4.Replacing the drive number n with the SCSI ID number of the new HD SC, enter the following command:
dp /dev/rdsk/cnd0s31The
dputility then prompts you for a command. For example, if you are partitioning a disk with SCSI ID number 6, the following message appears:
“/dev/dsk/c6d0s31” n partitions, m allocated [unknown sizes] Command?⬥ Note: If you get a different response, press the lowercase
qto quitdp. Reenter thedpcommand just given, making sure to specify the correct SCSI ID and to type the command correctly.
□ Replacing the value x with the index number of one of the identically named partitions, enter
c/x.You are prompted to identify the attribute field that you wish to change:
DPME Field?□ Enter
nto begin changing the partition’s name field. Now you are prompted for a name for the partition:
Name [Old-name]:□ Give the partition a name that is unique and that does not contain any embedded spaces. If
A/UX_Partitionhas not already been used, then you can enterA/UX_Partition.Again you are prompted for the attribute field that you wish to change
DPME Field?□ Enter
The root command prompt should reappear on the screen. Otherwise, if you still have any remaining partitions without unique names, return to the substep in which you enter the index number (qto return to thedputility’s first menu level. You will see the command promptCommand?If you have no more partition names that are not unique, you should save all the cumulative changes and quitdpby enteringw.cx).
If you have partitions named other than Misc A/UX, use
dpto associate slice numbers with these unmapped partitions.You can assign slice numbers permanently using
dp; see “Assigning Permanent Slice Numbers” in the following section.If you want to run file system consistency checks against the new partitions each time you reboot, then the startup files need to be altered.
See “Multiple File Systems and
fsck” in Chapter 8.
Assigning permanent slice numbers
To assign a permanent slice number to a partition, work either from A/UX Startup or at the A/UX command line. When you work within A/UX, the disk that you want to assign a permanent slice number should not be in use. For additional information on dp, see dp(1M) in A/UX System Administrator’s Reference.
Follow these steps to assign a permanent slice number to a disk.
Determine which slice numbers have already been assigned by entering
dp /dev/rdsk/cnd0s31where
s31stands for the entire disk. The system responds with the total number of partitions, the number of partitions allocated, and the total number of blocks on the disk; for example:
"/dev/dsk/c1d0s31" 9 partitions, 9 allocated 156369 blocks
followed by theCommand?prompt.If you want information about partition 7, for example, enter
p 7where
pprints the following general information about the partition:DPM Index: 7
The Disk Partition Map index number for partition 7 is the seventh record.Name: "Unreserved 1", Type: "Apple UNIX SVR2"
Gives the name and type of the partition.Physical: 2 @ 156366, Logical: 2 @ 0
Shows the physical and logical locations of the partition. In this example, the partition is two physical blocks long and starts at block 156366. For the user, the partition is two blocks long and starts at block 0.Status: valid alloc in_use not boot
read write
Gives general information about the partition. Of importance to you is whether the disk can be read from or written to.The following information that is printed is specific to A/UX file systems.
Slice 3
If you try to open Slice 3, you will be connected to the part of the disk that is described by the partition entry; in this case, partition 7.
Regular UNIX File System (1)
Cluster: 0 Type: FS Inode: 1
Made: [0] Wed Dec 31 16:00:00 1969
Mount: [0] Wed Dec 31 16:00:00 1969
Umount: [0] Wed Dec 31 16:00:00 1969No AltBlk map
Tells whether or not an alternate block map exists for the partition.To assign a permanent slice number for partition 7, enter the
change, orc, command at theCommand?prompt, for example:c 7You are prompted to enter the field in the Data Partition Map Entry (DPME) that you want to modify.
Enter
bfor Block Zero Block (BZB), the name for A/UX—specific information about the partition.DPME field? bYou are then prompted to enter the field in the BZB that you want to modify.
Enter
sfor slice number, for example:BZB Field? sIn response to the Slice number prompt, enter the slice number plus one (the system subtracts one from the number you enter).
Slice number + 1 [4]: 0You are then prompted to enter the next slice number to be modified.
To display the current information about the BZB field, enter p for print at the prompt.
BZB Field? pThe following information is displayed:
No slice specified
Regular UNIX File System (1)
Cluster: 0 Type: FS Inode: 1
Made: [0] Wed Dec 31 16:00:00 1969
Mount: [0] Wed Dec 31 16:00:00 1969
Umount: [0] Wed Dec 31 16:00:00 1969
No AltBlk mapTo specifiy that the BZB field be changed to slice 3, enter s 4 (3 plus 1):
BZB Field? s 4To display the new information about the BZB field, enter
p.BZB Field? pThe following information is displayed:
Slice 3
Regular UNIX File System (1)
Cluster: 0 Type: FS Inode: 1
Made: [0] Wed Dec 31 16:00:00 1969
Mount: [0] Wed Dec 31 16:00:00 1969
Umount: [0] Wed Dec 31 16:00:00 1969
No AltBlk mapIf you do not want to assign another slice number, enter
qat the BZB and DPME field prompts:BZB Field? qDPME Field? q
which returns you to the Command? prompt.
To assign the permanent slice number, enter
wat theCommand?prompt to write it to disk.To exit the program, enter
Qat theCommand?prompt.
The slice number that you assigned to the disk remains until you change it again using the dp program.
Making and mounting an A/UX file system

If you would prefer to use the Commando dialogs instead of the command line interface to make and mount file systems, see Chapter 4, “Adding and Managing Hard Disk SCs,” in Setting Up Accounts and Peripherals for A/UX. The number of steps given in this section for making and mounting an A/UX file system can be reduced by using the fsentry command or fsentry Commando dialog. See step 4.
You will probably want to store files and programs in the partitions created by HD SC Setup. To do so, you first need to create the A/UX file system structures that support them. Another possible use for partition space is as an A/UX swap area, as described in “Adding Swap Space,” later in this chapter.
After partitioning your disk with HD SC Setup, you can make A/UX file systems for those partitions in which you intend to store files and programs. For each such file system, perform the following steps.
⬥ Note: Some partition configurations cannot take advantage of the automatic slice number mapping. Table 5-1, earlier in this chapter, shows how A/UX attempts to map the various partition types to unique slice numbers. Until you associate these partitions with slice numbers manually, you cannot use them in the following procedure. Refer to the earlier section “Using dp” before continuing. You can create four user partitions on the root disk and seven on the other disks before having to use dp.
Boot A/UX.
Choose Restart from the Special menu. Do not reinsert the Utilities 1 disk. Rather, let the system boot from your installed version of A/UX. The A/UX Startup application should boot A/UX to multi-user mode.
Use
newfsto make a file system inside an existing partition.The
newfsutility constructs a file system on a block device such as an HD SC.The format of thenewfscommand you will enter is
newfs /dev/dsk/cd0sy type-of-diskThe variables in this command for which you must supply values are
n The SCSI ID number of the disk. This number is normally 5 for the first external HD SC, or 6 for the second.
y The A/UX disk slice number, which identifies a particular partition.
See “Using newfs,” later in this chapter, for more information.
Replace the correct values for the variables for the
newfscommand line.If you have used the Misc A/UX type, no slice number will have been assigned. Go to “Using
dp” earlier in this chapter to assign a slice number. Then enter thenewfscommand as described here.newfs /dev/dsk/cnd0sy type-of-diskFor example, suppose that the SCSI ID number for the disk you are preparing is 6, and you chose A/UX root as the partition type. Enter the following command:
newfs /dev/dsk/c6d0s0 HD80SCInformation on the file system is displayed on the screen after the file system is created. (If you have a third-party hard disk, use the appropriate Apple disk designation; for example,
HD80SCfor an 80-megabyte hard disk.)Run
fsckon the new file system partition.To ensure the consistency of the file system you just made, run the
fsckutility by entering the following command, substituting the SCSI ID number of the HD SC for n and substituting the slice number of the partition for y.fsck -y /dev/dsk/cnd0sYFor example, if the SCSI ID number of your new external HD SC is 6 and the slice number of the partition is 0, enter the command
fsck -y /dev/dsk/c6d0s0If any inconsistencies exist,
fsckautomatically repairs them for you.Decide on a mount point for the new file system.
Then you can follow the rest of these steps, or use the
fsentrycommand or Commando dialog to mount the file system and to make an entry in/etc/fstab. See “Mounting a File System Permanently:fsentry,” later in this chapter, for details.You attach an A/UX file system to the rest of the directory hierarchy at a mount point. You can use any directory for a mount point. It is usually best to use an empty directory because the mounted file system overlays any files in the directory, making them inacessible during that time. For example, the empty directory
/mntwas shipped on your A/UX distribution disk as a convenient mount point. Reserve/mntfor temporary file systems; for example, you may wish to use/mntfor mounting file systems on removable floppy disks.To create the directory intended for use as a mount point,enter
mkdirmount-pointFor the example in the next few steps, slice 0 of your external HD SC with SCSI ID number 6 is assumed to be dedicated to hold documentation. In that case, the following command line makes a descriptive mount point:
mkdir /pubsThe directory
/pubsis the mount point where you could attach the newly created file system.Mount the new file system.
Replacing the SCSI ID number of the HD SC for n, and replacing the partition slice for y, enter the following command
mount -v /dev/dsk/cnd0sy mount-pointThe command returns a message informing you that your new file system is now mounted at mount-point.
In this case, enter
mount -v /dev/dsk/c6d0s0 /pubs⬥ Note: The
mountandumountcommands refer to the file system type in/etc/fstab, or make use of the-T(type) option.Test the file system.
To verify that your new file system is accessible, try writing to it and reading from it by giving the following commands:
cp /etc/passwd/mount-point/mount.test
cat/mount-point/mount.testYour system’s password file should scroll across your screen. To remove the test file, enter the command:
rm/mount-point/mount.testIf the password file does not appear, reenter the commands in this step, making sure to type them correctly. If the password file still does not appear, start over at step 1 of this section and repeat all of the steps.
Update the mount entries in
/etc/fstab.You’ll also want to update the file system table in
/etc/fstab.When changing an important system file like this, it is always a good idea to make a copy of it first. That way, if something goes wrong, you can always reinstate the copy to its original name and restore your system to its previous state. After copying
/etc/fstab, edit the file to include this line:/dev/dsk/cnd0s0 mount-point 4.2 rw 0 2For an explanation of the fields in
/etc/fstab, see Figure 8-6, “A Description of Sample Entries in/etc/fstab.” See the section “Multiple File Systems andfsck,” in Chapter 8, for more information on the relevance of these fields. You can also refer tofstab(4) in A/UX Programmer’s Reference.
Using newfs
The command to make a file system differs for UFS and SVFS. Use the newfs command to make a UFS file system. With newfs you don’t have to enter the size of the partition in inode blocks, as required for mkfs; simply enter the disk type and let newfs calculate it for you. The newfs program creates file systems by placing the correct initial values into a superblock and storing them at the starting block offset for the associated partition.
To run newfs, you must supply a slice number and SCSI ID number as part of a special filename construct. This construct identifies the partition and disk to receive the file system (see “Using Partition Administration Commands,” earlier in this chapter).
The syntax for newfs is
newfs /dev/dsk/c?d?s? device-type
where device type can be substituted for the disk type listed in your /etc/disktab file— for example, HD80SC. If you have a third-party disk, use the Apple designation for disks of the same size.
The mkfs command is still supported for making SVFS file systems. To create a new SVFS file system, use the mkfs command, which is described in the mkfs(1M) man page.
⬥ Note: The file system initially created by newfs contains one directory called lost+found, which is where the file system check program (fsck) stores files that have become disconnected from the file system.
The newfs Commando dialog box shown in Figure 5-8 simplifies using this command by prompting you to build the appropriate newfs command line.
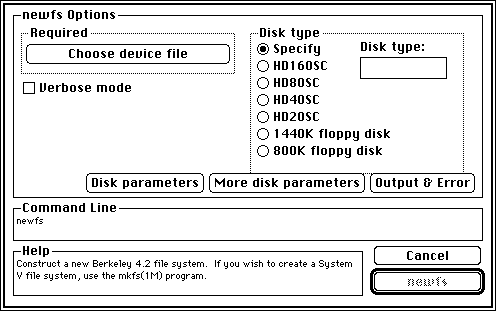 Figure 5-8 The newfs Commando dialog box
Follow these steps to create a UFS file system using the newfs Commando dialog:
As the root user, type newfs and press COMMAND-K from a CommandShell window.
Click your appropriate disk type radio button.
If you do not have one of those listed, click Specify and refer to your disk drive manufacturer’s specifications for the correct entry.
To specify the device to mount, click “Choose device file.”
When specifying the device name for a hard disk, begin with the prefix /dev/dsk.
Select /dev/dsk from the file dialog.
To open the dev folder, double-click it. To open the dsk folder, double-click it. A list of the extensions to the device name /dev/dsk is displayed. Scroll down to the one that describes your partition. Double-click it.
The extension to a device name has the form c_n_d0s_x_, where n is the SCSI ID number for the disk and x is the slice number for the partition. If you created a partition for user files, use slice number 3. If you created a /usr partition, use slice number 2.
⬥ Note: If your disk contains two A/UX partitions, you’ll have to run newfs twice. If you need to trace your way back to the / directory, press and drag down on the current directory name displayed at the top of the dialog Lox and select /.
After selecting a name, you return to the newfs dialog box. The full device name you specified is shown in the command-line box.
Click newfs to return to the CommandShell window.
Press RETURN to run the command.
Mounting a file system permanently: fsentry
Use the fsentry(1M) command to mount a file system and to create an entry in the file system table, /etc/fstab. You can make one entry each time you invoke the command. After the entry is made, the command automatically mounts the file system unless you set an option in the command line to override this action. For a description of the Commando dialog box for fsentry, see “Mounting a File System,” in Chapter 4 of Setting Up Accounts and Peripherals for A/UX.
To create a file system table entry using fsentry, become the superuser, then enter fsentry
at the command line, followed by these required command line arguments
-t type
The type of file system: enter 4.2 for UFS; 5.2 for SVFS (or nfs).
device-file
The file system to be mounted; for example, /dev/dsk/cnd0sx, where n is the SCSI ID number of the hard disk that contains the file system, and x is the slice number (usually 0 to 29, inclusive—never use slice 30 or 31).
mount-point
The full pathname of a directory on the local machine that is to be used as a mount point; for example, an A/UX user file system may be mounted at /users (the A/UX convention) or /user. The /usr directory tree may be mounted at directory /usr. The fsentry command creates this directory if it does not exist.
For example,
fsentry -4.2 /dev/dsk/c5d0s3 /user
creates a file system table entry that shows that the file system located at /dev/dsk/c5d0s3 is to be mounted at /user.
⬥ Note: If you have more than one A/UX file system on the disk, enter the fsentry command once for each of them.
See the fsentry(1M) man page in A/UX Command Reference for additional options that allow you to override default values. Examples are the number of passes that fsck, the file system checker makes; and the dump frequency used by the dump.bsd command discussed in Chapter 4, “Backing Up Your System.”
Adding swap space
You can use the space allocated for a partition not only to create file systems but also to increase the A/UX swap area from the 18 megabytes provided. The partition that you wish to use for swap space must already be associated with Slice 1—the type Swap from HD SC Setup or the type SFS from dp. Refer to “Using dp,” earlier in this chapter, to determine whether you need to perform any additional steps and what those steps are. These A/UX requirements for disk access are explained in detail in “The Three Steps of a File Access,” earlier in this chapter.
Two steps are involved in using a partition as additional swap space. The first is to obtain the information you will need to specify in the /etc/swap command line. Once you know these details, the next step is to enter the appropriate command request containing those details.
To start, obtain the starting disk block where the partition begins and the length of the partition in disk blocks.
Replacing the SCSI device number n with the correct value, enter
echo P I dp -q /dev/dsk/cnd0s31 I egrep "NameIPhysISlice"
Note the statistics provided for the partition you wish to be used as swap space. For example, if the partition name is Swap, the block offset to it is 108532, and its size is 19606, the following three lines of information will appear somewhere in the output of the preceding command. Note the slice number.
Name: "Swap", Type: "Apple_UNIX_SVR2" Physical: 19606 @ 108532, Logical: 19606 @ 0 Slice 1
⬥ Note: Slice 1 is reserved for swap file systems. If you assign type Swap from HD SC Setup, or type SFS for dp , the slice number is Slice 1.
Increase your swap space.
Now you have all the important information you need for actually increasing your swap space. Replacing the SCSI device number for n and the slice number for y, enter
/etc/swap -a /dev/dsk/cnd0sy
To confirm that you have done what you set out to do, obtain a report of the swap spaces currently in use by entering
/etc/swap -1
One-line descriptions of the swap areas are reported for each swap area currently recognized.